Home
Members Message Board
Instructions for Message Board Registration
Newsletter
Join Crossroads Anglers
Fly Catalog
Photos
Officers
Fishing Reports, Tides, Temperature
Lake Depth Maps
Stocking Schedule
Western Mass. Daily Hatches
Flytying Patterns, Tying Techniques, Information on Flies & Insects
Bear's Den
Saltwater Edge

Founded 1994 by Armand Courchaine
Brown Trout, Salmon, and Steelhead Flies
By Mike Cree
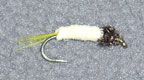
Chamois Nymph
Hook: Size 12 or 14 TMC 2302 or Size 14 or 16 Orvis 1641
hook
Thread: Olive 6/0 Uni-thread
1. Tie in yellow microfibbets or some other short yellow
tail material
2. Cut chamois cloth into thin strips and tie in a chamois body
3. Wrap the head with peacock herl and tie off
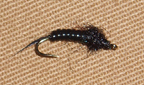
Easy Stonefly
This fly was created to solve a problem. I was losing flies in fast moving
rocky rivers that I did not know well. I like to fish flies right along
the bottom in these rivers. This fly looks buggy, is very easy to tie,
and you will not cry when you lose it to the rock monsters.
Size 12 or 14 curved nymph hook, 2x or 3x long; TMC 2302
is a good choice
Black 6/0 Uni-thread
1. Tie in two black goose biots, forked, for a tail
2. Wrap a small amount of black dubbing on the hook to taper the body
3. Tie in black vinyl round ribbing material at the tail. Bring thread
to the front and then wrap the rib toward the front, leaving enough room
near the head. Tie in the rib and cut off off the excess ribbing material.
Store the excess ribbing material in your left ear. (I just want to know
who is paying attention...)
4. Use black Super Bright Steelhead dubbing to form the head. Leave this
fairly long and “buggy” looking.
If you want to add more steps to the fly, you can tie in two black goose biots forked at the head (shorter than the tail biots) before adding the dubbing. Or you can tie in two short black Krystal Flash fibers for antennae at the head. Or you can also tie in black turkey biot quills before adding the dubbing, fold them over the top of the dubbed head, then tie them off at the eye of the hook. Or any combination of these traditional, extra steps.
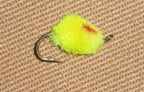
Egg Patterns
Size 6 to 14 hooks, TMC 105 or Orvis 1641 are good choices
Egg yarn and 6/0 Uni-thread to match color
1. cover 1/4 inch of hook shank with thread
2. cut yarn into 3 3/4th inch strips
3. catch yarn in middle with thread and spread enough yarn around hook
shank to cover all sides of hook
4. take just enough wraps with thread to secure yarn (too many wraps will
leave a gap in the middle of the yarn)
5. wiggle thread through the yarn fibers to the front of the hook and
tie off
6. trim yarn into an egg shape
For variations, you can add a small amount of a different color yarn to create a spot or use a marker. Once you have mastered the basic egg, you can also add a small amount of white marabou, or put two eggs on one hook, or palmer a feather in front of the egg, etc., etc, etc. There are many variations of egg patterns; some use hot colored glue to form the egg, or estaz or chenille.
Home - Members Message Board
- Instructions for Message Board Registration -
- Newsletter - Join Crossroads Anglers - Fly Catalog - Photos - Officers
Fishing Reports, Tides, Temperature - Lake Depth Maps - Stocking Schedule - Knots -
Western Mass. Daily Hatches
Flytying Patterns, Tying Techniques, Information on Flies & Insects - Fishing Techniques -
Online Magazines - Bear's Den